
Danny:
Your latest post brings up several questions for me. I don't think I see what you have described . . . or I'm having a real failure of imagination to reconcile a) what you described with b) what the photos show and c) what I imagine might be happening. Enneywayeeee . . .
1. Detonation often leaves evidence of its shock-wave erosion of materials out in the squish area . . . where-ever in the heck it happens in the squish area (may not be anywhere near the exhaust port) So no surprise about that stuff.
2. Are you sure you aren't just seeing some sort of original defect/damage to the piston? You describe an impact area .010"-.015" across the crown and .003"-.005" deep. I'm not seeing that in the photo. I clearly see what looks like an off-center piston crown edge which is off center about the same amount as it is deep. I can't reconcile your report of depth being only about 1/3 of the "across the top of the crown" dimension. mayhaps I'm looking at the wrong thing. At any rate . . . I sure don't like that crown edge just above the anti-rotation pin.
3. Is the OD of the squish area machined into the head so far off center that (basically) the sealing surface of the head is being contacted by the edge of piston crown? That would be wayeeee out of tolerance . . . and the only way I can imagine the damage to the piston coming from contact with the engine running. Noting that the edge of the piston crown would have to travel up past the head seal surface of the cylinder, past the upper surface of the head gasket AND .010"-.015" past the seal surface of the head to sustain the damage I think I see in the photo. Has someone "shaved" the base of the cylinder by half a millimeter or a full millimeter?
4. I could be wrong . . . but I don't think rods "stretch" .010"-.015" to allow the sort of damage I think I see . . . or even .003"-.005" to result in the depth of damage your text indicates.
Soooo . . . color me skeptical on the concept that the piston and head were making contact. While I hold a very high degree of trust in your observations, I'm just not seeing what you've reported in the photos. (Did I mention, I could be wrong?)
Ed
Tired Combat Wombat
-
Bullfrog

- Posts: 2795
- Joined: Mon Jul 22, 2013 4:05 pm
- Location: Oregon, 12 miles from the center of the Hodaka Universe(Athena)
Re: Tired Combat Wombat
Keep the rubber side down!

Re: Tired Combat Wombat
Ed, I'm with you, something's wrong here. The edge of the crown should not be going above the deck. Maybe the non stock head gasket is not concentric. As you said the cylinder is short or the piston is to tall. Maybe the piston is for another model with a higher crown height. Unlikely of course but something's not right here. Keep us posted Danny, I'm sure you will figure it out.
Maxie
Danny, I was hiding under the porch when I detected your post! As you know, the thermodynamic people are after me.
Maxie
Danny, I was hiding under the porch when I detected your post! As you know, the thermodynamic people are after me.
Re: Tired Combat Wombat
Hey Ed,
I may not have done a good job describing what I see. My wife wanted to go out for a bit so was a little rushed.
1. I can understand how detonation could start at other points other than the exhaust side of the piston. Just seems it would be more likely to start in the hottest area of the combustion chamber.
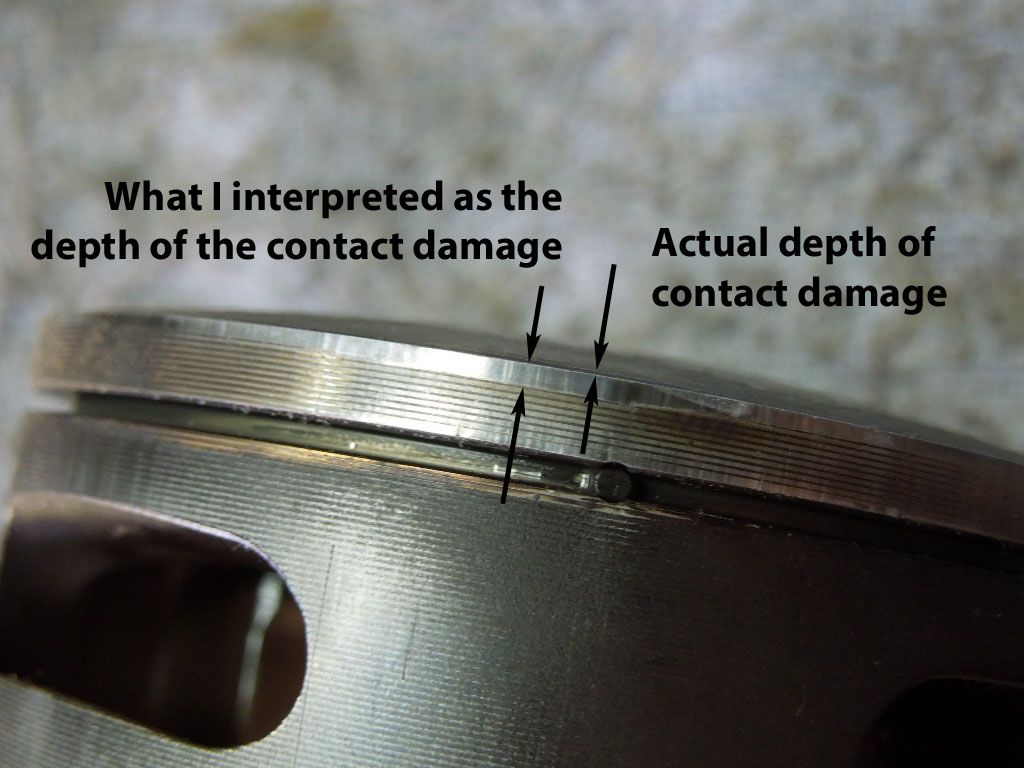
2.The piston crown edge damage is what I was trying to describe. It is not a manufacture defect. And yes the sealing edge of the cylinder head "appears" to just be hitting the edge of piston crown. I included a picture of the head gasket so I could show the head gasket was not the point of contact. The width of contact measures .017 inch and the best I can measure the depression is .007 to .008 inch deep. The second picture in my prior post shows the metal displacement from the top of the piston crown to the outside edge of the piston just above the anti rotation pin. Not sure what the 1/3 comment was about.
The "contact" between the head and piston crown is at the rear of the cylinder and right side of the engine. The damage on the exhaust side of the piston is on the left side. I would think as the piston contacted the head on the right rear the piston would try to move to the left and forward excessively loading the left exhaust side of the piston. Once the left exhaust side started to seize and reduce bore clearance the seizure on the left intake side of the piston began. Of course the resulting sticking of the ring ceased engine operation.
The piston does fit in the cylinder head combustion chamber with a very small amount of clearance around its diameter.
I pulled a straight edge across the cylinder head gasket surface so you can see the edge that looks like it could have contacted the piston. If contact was made it is due to lack of concentricity of the combustion chamber and possibly other causes.
3 and 4. Contact between these two components certainly occurred during operation. The piston is .040 over size late production Wiseco. Keep in mind also I was using a .010 inch thinner head gasket. There just may not have been enough squish clearance with this combination of parts. I do think the contact was occurring at high rpm due to lack of sufficient clearance rather than no clearance. No knocking or abnormal noise was noticed during the time I operated the machine. I did just go out and check the big end crank bearing and all seems good there also. The cylinder is at Power Seal and wont be back for a few days. I "think" the cylinder was not modified other than the port work I performed. When the cylinder arrives I can mock up all these parts and examine more thoroughly. There is definite contact at the edge of the piston crown and I can not see what could contact it other than the head at this point. That may change once all the parts are available for mock up.
Danny
I may not have done a good job describing what I see. My wife wanted to go out for a bit so was a little rushed.
1. I can understand how detonation could start at other points other than the exhaust side of the piston. Just seems it would be more likely to start in the hottest area of the combustion chamber.
2.The piston crown edge damage is what I was trying to describe. It is not a manufacture defect. And yes the sealing edge of the cylinder head "appears" to just be hitting the edge of piston crown. I included a picture of the head gasket so I could show the head gasket was not the point of contact. The width of contact measures .017 inch and the best I can measure the depression is .007 to .008 inch deep. The second picture in my prior post shows the metal displacement from the top of the piston crown to the outside edge of the piston just above the anti rotation pin. Not sure what the 1/3 comment was about.
The "contact" between the head and piston crown is at the rear of the cylinder and right side of the engine. The damage on the exhaust side of the piston is on the left side. I would think as the piston contacted the head on the right rear the piston would try to move to the left and forward excessively loading the left exhaust side of the piston. Once the left exhaust side started to seize and reduce bore clearance the seizure on the left intake side of the piston began. Of course the resulting sticking of the ring ceased engine operation.
Danny
Re: Tired Combat Wombat
Hey Ed,
You certainly got me thinking. Maybe it will or wont prove out. Will just have to wait and see how everything looks when the parts arrive and is mocked up.
Not sure at this moment if the head has been modified.
Danny
You certainly got me thinking. Maybe it will or wont prove out. Will just have to wait and see how everything looks when the parts arrive and is mocked up.
Not sure at this moment if the head has been modified.
Danny
-
Bullfrog
- Posts: 2795
- Joined: Mon Jul 22, 2013 4:05 pm
- Location: Oregon, 12 miles from the center of the Hodaka Universe(Athena)
Re: Tired Combat Wombat
Danny . . . Ah-ha! I see it now. I was misinterpreting the photo . . . but I've got it now. (my "1/3rd" comment was referring to the measured depth of damage being about 1/3rd of the measured width of damage . . . and I wasn't seeing that sort of difference in distances in the photos)
My guess is that the combustion chamber center and head bolt pattern center do not match. It'll be interesting read what you find. Though I'm still harboring the thought that compression was too high, which caused detonation which caused the seizure. (the engine had already created "clearance" at the top of stroke (of a sort) by "in service piston forging")
Ed
Keep the rubber side down!
-
taber hodaka
- Posts: 2241
- Joined: Mon Jul 29, 2013 6:34 pm
Re: Tired Combat Wombat
The contact damage is so smooth Piston flaw? there isn't enough movement area in the head to polish that is there. In the last picture of the head why is the head discolored almost to the head bolt? and the head looks like it was filed kinda. The engine still looks a little lean to me, lighter chocolate brown may be okay for normal riding lighter but for a engine running on the edge I would richen up a little.-----------Clarence
Re: Tired Combat Wombat
Clarence,
The discoloring is a sealant I apply to the head gasket surface. You can see some of the residue on the previous picture of the head gasket. The scratches on the head were done intentionally. I pulled the edge of a straight edge across the gasket surface to attempt to show the low edge of the gasket surface. It is cosmetic and will clean up with a little lapping....if I use this head.
Ed, when all is said and done it may well be to much compression. I thought I had an aha moment when I saw the depression on the edge of the piston crown. I don't remember the crown of the piston extending past the top of the cylinder when assembled so might not be.
Danny
Re: Tired Combat Wombat
Maxie
Danny, I was hiding under the porch when I detected your post! As you know, the thermodynamic people are after me.[/quote]
My mommy said I cant play with you no more.
Danny
Danny, I was hiding under the porch when I detected your post! As you know, the thermodynamic people are after me.
My mommy said I cant play with you no more.
Danny
Re: Tired Combat Wombat
Max,
Of course you know I am just having fun with you.
Danny
Of course you know I am just having fun with you.
Danny
Re: Tired Combat Wombat
Ok, I'll try to be good and mom did take my stick away that I tap on bee hives with.
Later
Maxie
Re: Tired Combat Wombat
So this is the Combat you were telling me about. I'm very impressed. I love the work you've done on the cases and on the reed valve ports. I'm hoping later on to upgrade this motor to a reed valve and the correct piston needed to make the reed valves work properly.it may be that I will send you my motor at that time! ; D Victor
1978 175SL
1976 03 Wombat
1975 Road Toad 2
1974 98 Super Rat
1974 97 Super Combat
1973 96 Dirt Squirt 2
1973 Wombat Combat
1973 Combat Wombat
1972 94 Wombat
1972 Super Squirt
1971 92B+ Ace
1970 92B Ace 100B 2
1968 92 Ace 100
1966 Ace 90
Re: Tired Combat Wombat
Thanks Vic. Whenever you are ready.
Danny
Danny
Re: Tired Combat Wombat
Cylinder arrived Friday from Power Seal and time to proceed. The bore plating job looks great. Piston is out getting coated so I will not begin to address the seizure issue until later.
I did want to make a change to the fuel system and have time while waiting for the piston to return. The motor was equipped with a GEM reed valve and I prefer the late model Hodaka reed valve assembly. The Road Toads, 03 Wombat, 98 Super Rat all use the same model 97 Super Combat reed valve assembly. Using the 97 model reed assembly allows the use of spigot mount carbs instead of flange mount.
The issue with mounting the 97 reed valve on the Combat Wombat cylinder is the stud spacing. The vertical stud locations are the same distance but the horizontal distance is greater on the Super Combat. The vertical center to center stud spacing on both cylinders is 20mm. The Combat Wombat center to center horizontal stud spacing is 54mm where as the Super Combat is 60mm. So with that in mind I laid out the new stud locations.
The cylinder intake gasket flange is wider on the factory reed valve engines to allow for the wider stud spacing. On the Combat cylinder the gasket flange is not as wide. I was afraid the area on the out side of the relocated studs might be to thin with the standard 6mm studs. So I took some used engine case screws, cut off the heads, reduced part of the stud diameter to 5mm and rethreaded to 5mm x .9. Basically ended up with a 5mm thread on one end to allow more material to remain on the out side of the cylinder gasket flange. The other end of the stud is original 6mm x 1.0 thread.
Threaded some aluminum stock 6mm x 1.0, applied JB Weld epoxy, install threaded rod to fill original stud holes and cut off with hack saw.
Center punched the new stud location, filed aluminum inserts flush, block sanded gasket surface, drilled and tapped new stud holes.
Installed fabricated studs with red Loctite.
Turned out ok and all I have time for today.
Danny
I did want to make a change to the fuel system and have time while waiting for the piston to return. The motor was equipped with a GEM reed valve and I prefer the late model Hodaka reed valve assembly. The Road Toads, 03 Wombat, 98 Super Rat all use the same model 97 Super Combat reed valve assembly. Using the 97 model reed assembly allows the use of spigot mount carbs instead of flange mount.
The issue with mounting the 97 reed valve on the Combat Wombat cylinder is the stud spacing. The vertical stud locations are the same distance but the horizontal distance is greater on the Super Combat. The vertical center to center stud spacing on both cylinders is 20mm. The Combat Wombat center to center horizontal stud spacing is 54mm where as the Super Combat is 60mm. So with that in mind I laid out the new stud locations.
Re: Tired Combat Wombat
Good job Danny, I wouldnt worry about there not being enough material to support 6mm studs , I have done many of these without any issues. Even on the iton cylinders , however those have way less meterial there. Still no issues.
Rich
Rich
Re: Tired Combat Wombat
Ah, fun to see the project underway again! Excellent job on relocating the studs and great photography. (Max the photographer notices such things.) Keep up the good work! 
Max
Max
Re: Tired Combat Wombat
Very busy day today with the tired Combat Wombat. Lots of info to share and will break this post into two. Start with the reed valve cage and reeds. This is the stock model 97 reed cage and reeds.
I have a set of one piece carbon fiber reed petals and modified the reed cage for same. Of course the parts have also been cleaned and refinished.
Those are not holes in the reed. It is just the back ground light shining through the reed material.
Danny
Re: Tired Combat Wombat
My eyes were to tired to post last night so here we go. This is where the rubber hits the road concerning the piston seizure event. Lots of info for consideration.
Questions were asked previously if the cylinder had been modified. I have a spare unmodified combat wombat cylinder to compare. A quick and dirty check with a straight edge confirmed both the head gasket and base gasket surfaces were un-modified. I measured the port heights and all measured the same on both cylinders. So except for the intake port mods I made both cylinders measured the same.
Time to turn my attention to the Wiseco piston. GMC had mentioned checking the piston dome and maybe some other measurements. Seemed like a good idea to me and I wanted to check everything to prevent failure. So I grabbed an original Hodaka piston and compared It to the new and seized Wiseco piston we are using. I don't use it much but I got out my granite surface plate and surface gage with dial test indicator. With the piston pin installed and linking the two pistons, the first thing I noticed was the distance from the piston pin to the skirt was shorter on the Wiseco piston. In order to make precise measurements both piston skirts have to be supported. I have some flat shim stock and ended up with .018 inch shim under the Wiseco piston with both pistons connected with the piston pin.
With both pistons properly supported I did a quick check with a straight edge and you can see the top of the Wiseco piston is taller than the original Hodaka. Same check on the seized Wiseco piston gave the same results.
Using the dial test indicator the new Wiseco piston measured .012 inch taller than the original Hodaka. Same check on the seized Wiseco piston gave the same results. Realizing all parts are not made exactly the same and manufacturing tolerances exist, I performed the same measurements with a different Hodaka piston and the Wiseco piston measured .007 inch taller. Just wanted to mention the ceramic coating applied to the crown of the Wisco piston is less than .001 inch thick and has little affect on these measurements.
The dome on the Hodaka piston appears to be flatter than the new Wiseco.
So with the measurements completed I installed the new Wiseco piston assembly, cylinder and original combat wombat head. Not wanting to waste or anneal head gaskets I used the same .010 inch copper head gasket removed. The old head gasket still measured .010 inch and will be "ok" for basic compression test comparison. A new gasket will be installed when these tests are completed. With a little two stroke oil added to the cylinder, I kicked the engine through a few revolutions and checked cranking compression. Initially my gage only measured 125 psi. I knew the piston ring had not seated but expected higher readings none the less. Placed my thumb over the spark plug hole and kicked the engine over. My thumb-ometer indicated the compression gage reading was probably not correct. I have a Snap On compression gage with several hose adaptors that has proved accurate for many years....that is until now. Seems a couple of the adaptor seals have deteriorated and leak where they attach to the cylinder head. Fortunately the least used adaptor I had still sealed properly and gave accurate results. It was the least used because it is basically a fitting that is difficult to access when used. As you can see this combination has 195 psi compression reading that is much higher than desired. Next I took a length of .060 diameter solder and inserted it in the spark plug hole until it touched the cylinder wall. Carefully rotated the engine through one rotation and measured the flattened solder....measured .045 inch...... repeated and measured .042 inch. This test measures cylinder head squish area to piston crown clearance and proves there is sufficient clearance. So there goes my thoughts the piston could be hitting the cylinder head. I was having my doubts any way.
Next I installed an 03 wombat head that has a larger combustion chamber volume and cranking compression dropped to 170 psi with the same .010 inch head gasket. Compression is still a little higher than desired. The .06 solder was not compressed when inserted in the spark plug hole and the engine rotated.
This post is getting long and I will post my conclusions on a separate post.
Danny
Questions were asked previously if the cylinder had been modified. I have a spare unmodified combat wombat cylinder to compare. A quick and dirty check with a straight edge confirmed both the head gasket and base gasket surfaces were un-modified. I measured the port heights and all measured the same on both cylinders. So except for the intake port mods I made both cylinders measured the same.
Danny
Re: Tired Combat Wombat
It is both instructive and gratifying to follow a technician with solid method through an investigation like this. Observation: while the crown of the Wisco is a bit higher than stock, it appears from the photos that the shoulder height (highest point of the piston in contact with the cylinder wall) is about the same, although the stock piston uses a Dykes which is not in place for such reference. Assuming that if the ring were installed the shoulder height would be roughly par, the higher dome on the Wisco must also create a different radius across the crown versus the stock. So you would not only have higher compression, but also a squish area that was probably keystone shaped. This is assuming that the original head radius is basically the same as the piston crown radius. I don't know what effect such a difference in radius would have on flame propagation, but I doubt it is good.
Using the compressible solder as a sort of plastigage, can you see if the solder is compressed more at the inner ring of the squish (closest to the plug) versus the outer perimeter? Or is the compressed portion of the solder the same thickness throughout the range of compressed surface? If the solder is not thick enough to do the same test with the stock piston, do you have access to modeling clay?
This is only an assumption, but I assume that proper flame propagation requires parallel surfaces between piston dome and squish band on the head.
-
Bullfrog
- Posts: 2795
- Joined: Mon Jul 22, 2013 4:05 pm
- Location: Oregon, 12 miles from the center of the Hodaka Universe(Athena)
Re: Tired Combat Wombat
As usual, your work is very thorough and very well documented Danny. Seems pretty clear that excessive compression is at the root of the problem - though I'm still on pins and needles about the apparent piston/head contact.
Ed
Ed
Keep the rubber side down!
Re: Tired Combat Wombat
Hey Ed,
I did try the solder test for the squish band clearance and the combat wombat head collapsed the .060 inch solder to .042 and .045 inch. The 03 Wombat head would not compress the solder at all. I am making some other checks with modeling clay but at this point I doubt the piston contacted the head. I have not completely ruled it out as a possibility just not likely with that amount of clearance. If no contact can be proved I am not sure what caused the mark on the crown of the piston.
What does appear to be a possibility is there "may" be greater compression when using the Wiseco piston rather than the original Hodaka piston. This is not a bad thing just need to be aware of the possibility and adjust accordingly. The Wiseco seems to be built stronger and I like the intake port arrangement as well as the narrow piston ring.
One thing I noticed with the Wiseco piston / ring and the Nicaseal cylinder plating was the lack of friction when the engine was cranked over with out the spark plug installed. With a good kick on the kick starter you would have thought there was no ring tension. But as you could see from the compression testing the ring was sealing very well for an engine with zero hours. I am thinking this combination may increase power out put by a reduction in internal engine friction...time I guess will tell. Every little bit of increase in these small engines adds up.
I am envious of your current location . Be careful....it may be confusing trying to keep the rubber side down... down under!
Danny
I did try the solder test for the squish band clearance and the combat wombat head collapsed the .060 inch solder to .042 and .045 inch. The 03 Wombat head would not compress the solder at all. I am making some other checks with modeling clay but at this point I doubt the piston contacted the head. I have not completely ruled it out as a possibility just not likely with that amount of clearance. If no contact can be proved I am not sure what caused the mark on the crown of the piston.
What does appear to be a possibility is there "may" be greater compression when using the Wiseco piston rather than the original Hodaka piston. This is not a bad thing just need to be aware of the possibility and adjust accordingly. The Wiseco seems to be built stronger and I like the intake port arrangement as well as the narrow piston ring.
One thing I noticed with the Wiseco piston / ring and the Nicaseal cylinder plating was the lack of friction when the engine was cranked over with out the spark plug installed. With a good kick on the kick starter you would have thought there was no ring tension. But as you could see from the compression testing the ring was sealing very well for an engine with zero hours. I am thinking this combination may increase power out put by a reduction in internal engine friction...time I guess will tell. Every little bit of increase in these small engines adds up.
I am envious of your current location
Danny
Re: Tired Combat Wombat
Hey Danny, good science going on here. I'm liking it!
Maxie
Maxie
Re: Tired Combat Wombat
Danny,
Your comment about the lack of friction due to the nickel coating is interesting. Have you used PowerSealUSA before? Did the bore turn out as you expected in terms of consistency, surfacing, clearances and such? Was there discussion with PowerSeal regarding the piston clearance when using the Wiseco piston? More, less, the same as with stock piston?
You will need to give us your impressions during break-in. I am seriously considering the process for my RD350 and for the Hodaka if the benefits are there.
Re: Tired Combat Wombat
I am working today to find the best way to lower cranking compression so the engine will perform and live. All of the stock combat wombat engines I have built with stock Hodaka pistons, heads and head gaskets have ended up with 165 psi cranking compression. The Wiseco piston I am using in this engine appears to be producing higher compression readings than I am used to seeing. I did not get a picture, but the Wiseco piston crown radius is a very close match to the 03 wombat piston crown radius. So at this point I want to get the cranking compression in the 165 to 170 psi range and compare the combustion chamber squish angles and clearance.
The Wiseco piston is above the cylinder surface very slightly at tdc. Looks to be about .005 inch.
Using modeling clay I can see how the squish angles align and piston to cylinder head clearance. Still using the same .010 copper head gasket. I am comparing the original combat wombat head and an 03 wombat head. This picture is the 03 wombat head and you can see the piston crown and cylinder head squish area surfaces are fairly parallel. The clay measured .065 inch roughly in the squish area.
You can see the combat wombat head displaced more clay in the squish area. The combustion chamber and piston crown are not parallel but reduce as they approach the cylinder wall. Again still using the same .010 copper head gasket. The clay measured roughly .020 inch in the thinnest part.
I liked the wider squish band of the 03 Wombat head and the more centered concentration of the combustion chamber. I thought the .065 squish band clearance might be a bit to much for good performance though. So with that in mind I decided to see if I could find a way to make the original combat wombat head work. I needed to reduce compression and added torque grooves and the Hodaka .020 inch head gasket. Compression reading reduced to 185 psi. Still to high. Pictured below is the combat wombat head with torque grooves. I did not take a picture of the compression gage.
So with the combat wombat head ruled out I turned my attention to the 03 Wombat head. Again I cut torque grooves in the head and used the Hodaka .020 inch head gasket. Compression reading was 160 psi and close enough for testing.
Danny
The Wiseco piston is above the cylinder surface very slightly at tdc. Looks to be about .005 inch.
Re: Tired Combat Wombat
GMC,
First impressions of the nicasil plating and Powerseal are very good. This is my first time using them. I did call and speak with Jamie about turn around time, expedited service and cylinder to piston clearance. I requested .0005 inch additional piston to cylinder clearance for reliability as well as having some extra room for piston replacements that might be more on the larger end of tolerance. Wiseco's clearance recommendation for this piston was .0015 to .002 inch if I remember correctly. I will report later on how the plating holds up.
Danny
Re: Tired Combat Wombat
Thanks Danny, we all learn when you do. As for changing compression, don't overlook using a slightly thicker base gasket. If the piston shoulder is slightly higher than usual, raising the cylinder will normalize timing and at the same time lower pressures. Not to mention it is easy to do.
Who is online
Users browsing this forum: No registered users and 50 guests