Page 7 of 9
Re: Project Dirt Squirt
Posted: Sat Feb 25, 2017 4:21 pm
by Zeek
Darrell wrote:
As well, it looks like you also come with considerable graphic design and printing skills to flex. Both my Hodakas had dealership stickers that I would like to have reproduced, if I knew how to go about it. One of the original dealers was still living at the time of my first Hodaka restoration and I'm sure he would have been flattered if I had reproduced the sticker for his dealership named, "The Trail Rider".
You mistake me for someone else.......I'm sure if i told you just how long it took me to do that round sticker you'd say different

I've found out a bit of info about the old dealership. He is survived by his wife who still lives in the area, I was put in touch with a friend of the family who asked about the possibility that there may still be a stash of old shop stickers around, but apparently not

A lot of people I've talked to don't even remember the shop ( and we didn't even live in the state back then) so I'm keen to replace them.
viclioce wrote:Welcome back Glenn! Glad to hear from you! Keep moving forward. ; D Victor
Yes, onward and upward

Re: Project Dirt Squirt
Posted: Sat Feb 25, 2017 4:27 pm
by matt glascock
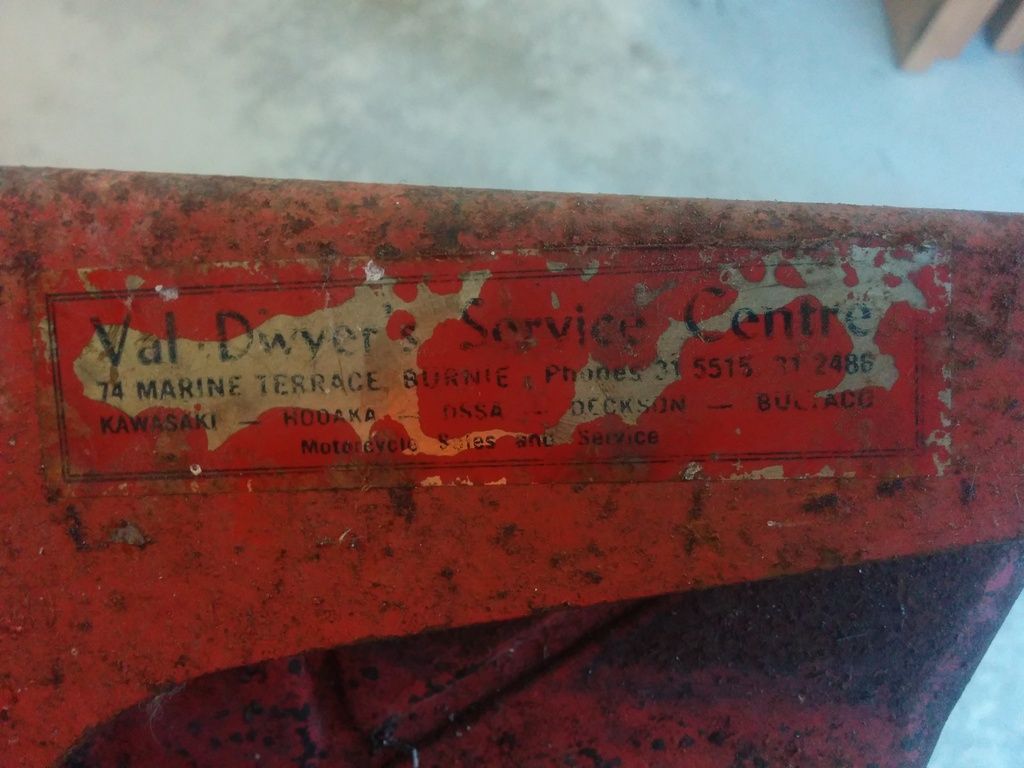
Here's something cool. I have a Val Dwyer's Service Centre sticker on an Ace 100 chain guard. Its the rectangular and not the round one. Your facsimile looks good as far as font but the color of the sticker is red with black lettering - at least on mine.
Re: Project Dirt Squirt
Posted: Sat Feb 25, 2017 6:56 pm
by Zeek
matt glascock wrote:Here's something cool. I have a Val Dwyer's Service Centre sticker on an Ace 100 chain guard. Its the rectangular and not the round one. Your facsimile looks good as far as font but the color of the sticker is red with black lettering - at least on mine.
Yeah?
Where are you situated?
As on my picture of the original, it sorta looks red but appears to have a bright foil shine as well?
I was going to do it as black letters on a "chrome" background.
Can you get a pic of yours?
Re: Project Dirt Squirt
Posted: Sat Feb 25, 2017 7:09 pm
by matt glascock
I'm in Cedar Falls, Iowa, USA. I'll see if I can get a picture of it posted for you. I can't remember a particular shine to it but its been a while since I've seen it. I'll dig into the stash tomorrow and see if I can hunt it up.
Re: Project Dirt Squirt
Posted: Sat Feb 25, 2017 7:12 pm
by Zeek
matt glascock wrote:I'm in Cedar Falls, Iowa, USA. I'll see if I can get a picture of it posted for you. I can't remember a particular shine to it but its been a while since I've seen it. I'll dig into the stash tomorrow and see if I can hunt it up.
Iowa! The plot thickens

Surely a different dealer of the same name?
Re: Project Dirt Squirt
Posted: Sat Feb 25, 2017 7:28 pm
by matt glascock
Negative. Exactly the same sticker. I was always curious but never knew where Burnie was until I crossed it with your location in Tazmania.
Re: Project Dirt Squirt
Posted: Sun Feb 26, 2017 6:45 am
by viclioce
Glenn, they sure do look like they were printed on foil backed sticker material of some kind. Maybe something like a chrome plastic coated paper? If you need someone to print them for you, the guy I used here for my Road Toad stickers for me here in Santa Fe. Let me know if you want to go that route & i can give him the e-files. You can just email them to me along with dimensions. But I'm guessing you can find someone there!

Victor
Re: Project Dirt Squirt
Posted: Mon Feb 27, 2017 8:50 am
by Zeek
Hmmmm,. The light doesn't sit quite right on the Wombat guard.
I'll probably have to live with it until I can get the roadworthy done, then go back to the Squirt guard with a small enduro type tailight.
Re: Project Dirt Squirt
Posted: Mon Feb 27, 2017 9:43 am
by rlkarren
Actually it looks correct to me. That would be the correct light that came with the lighting kit anyway. Although the rubber washer you're using is much thicker than I would expect. I would suggest using a piece of an old inner tube cut to size instead.
$0.02
Roger
Re: Project Dirt Squirt
Posted: Mon Feb 27, 2017 10:00 am
by Zeek
rlkarren wrote:Actually it looks correct to me. That would be the correct light that came with the lighting kit anyway. Although the rubber washer you're using is much thicker than I would expect. I would suggest using a piece of an old inner tube cut to size instead.
$0.02
Roger
OK. I thought it should sit a bit more plumb than it is?
Might look better once seat is on.
Only using an old fender rubber at present, waiting on a new one.
Re: Project Dirt Squirt
Posted: Tue Feb 28, 2017 3:56 pm
by viclioce
Hey Glenn. If you want something smaller, you could try what I call the 6 volt doorbell! LOL! Actually it's bigger than a door bell. It was on the rear of my Wombat when I got it. I put new fenders but kept the rear light!

Victor
Re: Project Dirt Squirt
Posted: Tue Feb 28, 2017 8:30 pm
by Zeek
Yes, I might end up with something like that !
Next exercise was the fuel taps.
The white nylon valve in one tap was stuck fast and the slot for the lever totally missing??
Couldn't get it to budge no matter what!
This got it though

I had a 12mm nylon bolt and I have a drill press.....That makes me dangerous

Someone had tried removing it before and actually punched a hole through the nylon AND the rear of the tap body

I've threaded a 3mm stainless screw into the hole from the inside with a dab of threebond. Ground off the thread sticking out, and it looks the part.
Time will tell if this all works!
Re: Project Dirt Squirt
Posted: Tue Feb 28, 2017 8:32 pm
by Zeek
Another pretty picture

Bonus points for spotting the paint chip

Re: Project Dirt Squirt
Posted: Wed Mar 01, 2017 2:23 am
by taber hodaka
Just down from the A on Japan. Qtip and a touch of red, looking great. -------Clarence
Re: Project Dirt Squirt
Posted: Wed Mar 01, 2017 8:59 am
by MTRob
Zeek wrote:So i got hold of a Wombat rear guard at last.
Hoping this will work as far as being able to fit a taillight.
There certainly a difference between the Squirt and Wombat fenders.
Wombat v Squirt guard.jpg
This is the Wombat mocked up:
looks BIG! but I think once the seat and light go on it may balance out better?
Wombat rear guard.jpg
Zeek
How many holes are on the fender. I have two wombat fenders but looknig for a fender that has 4 holes not 6ix likr the wombat.
MTRob
Re: Project Dirt Squirt
Posted: Wed Mar 01, 2017 9:16 am
by MTRob
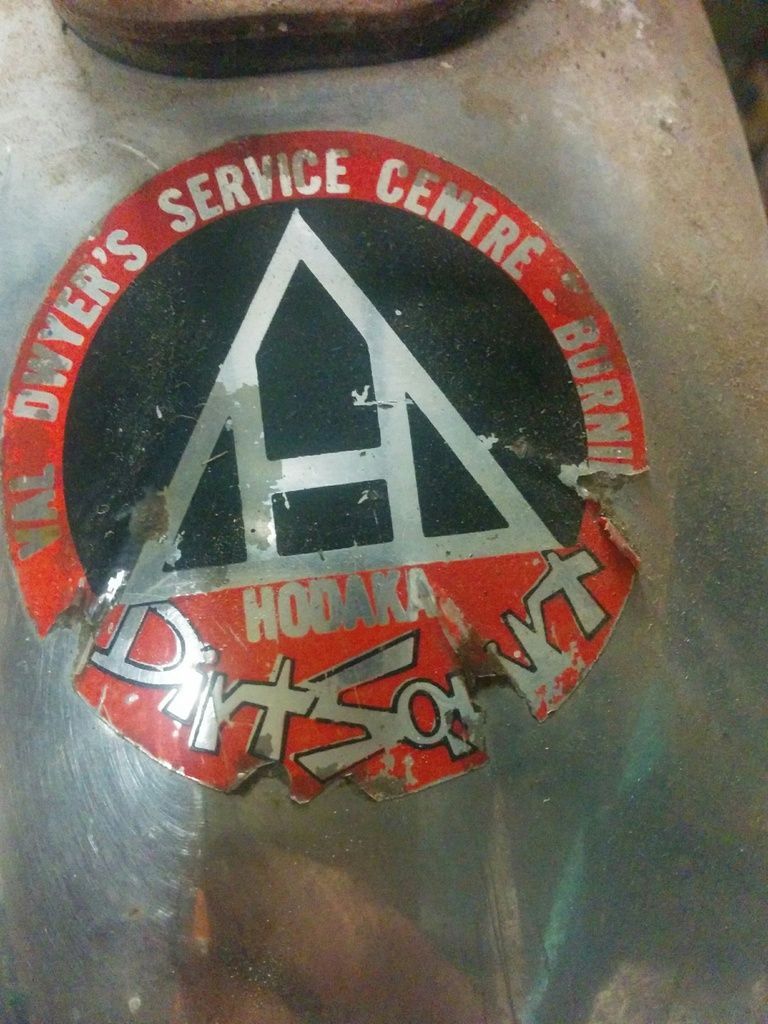
Zeek wrote:So these are the two dealership stickers that were still on the bike. The dealership was closed when the owner passed around 25 years ago, but I think they are an important part of this bike's history and need to be replaced.


Been waiting ages for a sticker shop to do them, but have now given up and re-drawn them myself..pretty close i think.
I have a new shop that will print them shortly.
I believe they can print them onto a shiny foil base, the white areas showing here will be "chrome" look.


zeek that sticker looks great , hears the problem Paul owns the trade mark of the triangle with the h in the middle. He could get upset and stop you or maybe he could care less. Its promotes the Hodaka name. So who knows maybe you should ask him. I he doesn't care I want a few
MTRob
Re: Project Dirt Squirt
Posted: Wed Mar 01, 2017 9:36 am
by Zeek
MTRob wrote:
Zeek
How many holes are on the fender. I have two wombat fenders but looknig for a fender that has 4 holes not 6ix likr the wombat.
MTRob
Standard Squirt fender has 4 holes

Re: Project Dirt Squirt
Posted: Wed Mar 01, 2017 2:53 pm
by Bullfrog
Reproduction of the logo for your own use is not a problem. Reproduction for sale is a problem.
Question - what the heck is a Deckson?
Ed
Re: Project Dirt Squirt
Posted: Wed Mar 01, 2017 8:54 pm
by Zeek
Bullfrog wrote:Reproduction of the logo for your own use is not a problem. Reproduction for sale is a problem.
Question - what the heck is a Deckson?
Ed
Hi powered racer from the '70's

Re: Project Dirt Squirt
Posted: Thu Mar 02, 2017 4:52 pm
by Zeek
Seat back!
Really happy with it.
The pan wasn't the greatest, but it is still sound.
Re: Project Dirt Squirt
Posted: Thu Mar 02, 2017 5:15 pm
by viclioce
The seat looks great Glenn! Pan looks OK too! ; D Victor
Re: Project Dirt Squirt
Posted: Thu Mar 02, 2017 7:51 pm
by Zeek
Re: Project Dirt Squirt
Posted: Sun Apr 09, 2017 9:03 pm
by Zeek
Hopefully get something done this coming weekend at last

Most necessary parts are here now.
Have sorted the wiring on the old light switch and new kill switch.
Issue with the light switch though...
It seems to have to be fitted to the left side of the bars, which means the kill switch needs to go on the right.

(unless the wire is looped back around the switch body)
Considering whether or not I may be able to reverse the horn and kill button wiring.
Also the kickstart rubber lays against the exhaust heat shield.....is this normal or is something not quite right?
Re: Project Dirt Squirt
Posted: Mon Apr 10, 2017 5:16 am
by viclioce
Check the positioning of the kick start lever on the shaft and adjust it so it doesn't make contact with the pipe. Which style kick start lever do you have? Is it this one? It should line up with the depression in the pipe.

Victor
Re: Project Dirt Squirt
Posted: Tue Apr 11, 2017 10:07 am
by dirty_rat
On my Wombat, the heat shield has a small relief cut into it where the end of the kicker index's into it. If yours is sitting farther forward and resting on the heat shield, the rubber kick stopped might be too short (worn or someone cut it down). Otherwise, there really isn't any adjustments to it.


