Page 5 of 8
Re: The Road Toad Starts Today!
Posted: Tue Jun 07, 2016 5:18 pm
by ---
I don't think it caused brain damage, but have you looked at your eyebrows lately?
MEK is a potent solvent. It has its uses, and is found in various things if you look at the labels. I try to use the least potent solvent for a given job, but short of stripping paint, MEK is about as potent as the common hobbyist needs.
Re: The Road Toad Starts Today!
Posted: Fri Jun 24, 2016 1:10 pm
by viclioce
OK! I got back from my 2 week Motorcycle trip to Northern California. I started pulling things apart and when I pulled the flywheel off I found what was making the crank hang. Turns out it wasn't the Yamabond but a simple flat washer which the magnetized flywheel must have picked up when I set it down on the work bench. I must have put it together without checking to make sure that there was nothing clinging to it. (Note to self; always check inside of flywheel before installing from now on!). Glad it wasn't something more difficult to figure out! ; D Victor
Re: The Road Toad Starts Today!
Posted: Fri Jun 24, 2016 1:28 pm
by viclioce
OK, NUTS!!!
It appears that the washer wasn't my only problem. I could move the crank easily before putting the flywheel back on. I tightened the flywheel down and the crank wouldn't turn again. I loosened the nut, and voila, the crank rotates.
So, am I over tightening the crank nut which holds the flywheel on? Is there a torque spec for it which I need and don't have? I would assume it's not something light weight like 16.5 ft/lbs?
I know a lot of folks are out to Athena this weekend. So any reply would be appreciated. ; D Victor
Re: The Road Toad Starts Today!
Posted: Fri Jun 24, 2016 3:50 pm
by matt glascock
Hi Victor, according to my official Road Toad owner manual, the flywheel nut should be torqued to 170 inch pounds which translates to 14.2 foot pounds. I guess its the taper of the shaft in combination with the Woodruff key that does the heavy lifting for this system. Make sure you have the star washer under the nut (Part # 65-10009 or something similar).
Best,
Matt
Re: The Road Toad Starts Today!
Posted: Fri Jun 24, 2016 4:28 pm
by viclioce

Matt. I have both a star washer & a flat washer. Yes I confirmed the 14.166 ft/lbs as well.
Tomorrow I am also going to make sure I don't gave anything causing it to bind up. 14.2 ft/lbs isn't a lot of torque. I was probably just putting the nut on too tightly.
; D Victor
Re: The Road Toad Starts Today!
Posted: Fri Jun 24, 2016 5:00 pm
by matt glascock
Hi Victor, I had a similar experience as you described where I left the star washer hidden inside the fly wheel. I replaced the flywheel and forgot to replace a lock washer on the crank shaft. The combination of rattling, grinding and shrieking sounds from the motor was very exciting. I'm not really sure why I need to learn these basics the hard way

. Anyway, I checked out the schematic and there is only the star washer between the nut and the flywheel. I cant imagine why the additional flat washer could cause the binding effect but it might be worth a try omitting it.
Re: The Road Toad Starts Today!
Posted: Fri Jun 24, 2016 5:24 pm
by bchappy
Something is causing the flywheel to drag against something as the flywheel nut does not tighten the flywheel to the bearing. It only tightens it to the taper on the crankshaft. Might be worthwhile to check that one of the 3 coils is not dragging the inside of the flywheel. Just a thought.
Re: The Road Toad Starts Today!
Posted: Fri Jun 24, 2016 7:22 pm
by Bullfrog
Vic,
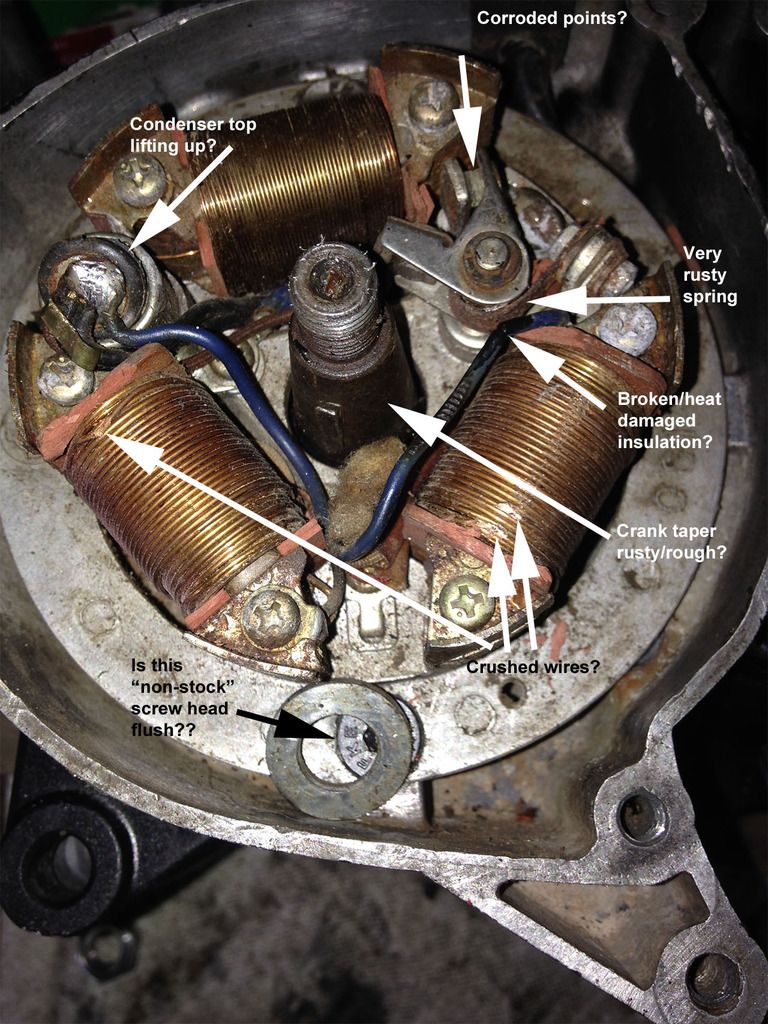
While the mechanical interference problem must be found and corrected, I'm afraid you may have continuing issues with the stator in the photo - and with the reliability of the of the fit of the flywheel taper to the crank taper. When you install the flywheel (perfectly aligned with the woodruff key) and then "hammered home" with the "heel of the hand" (no nut yet) does the flywheel turn true and free if you slowly stroke the kick starter by hand? In this situation, the flywheel should be comfortably snug on the taper and should clear every thing behind. Installing and tightening the nut shouldn't "move" the flywheel more than a few thousandths - so tightening the nut should not cause flywheel contact with other components regardless of the torque applied.
Is the crank taper as rusty and rough as it appears in the photo? If so, considerable clean up is needed there. What is the condition of the taper inside the flywheel?
The photo doesn't have arrows to the broken insulator plates at the end of the coils. Those items being broken is a sign of the age of the material. My own stator has some problems like that . . . and it gave up the ghost today. There are other age/corrosion and damage issues which will likely need attention once the mechanical interference problem is found and remedied.
Ed
Re: The Road Toad Starts Today!
Posted: Sat Jun 25, 2016 12:54 pm
by Hosk1956
What is the aluminium foil and water approach?? I have never heard of that!
Wayne from Oz.
Re: The Road Toad Starts Today!
Posted: Sat Jun 25, 2016 1:48 pm
by viclioce
Wayne. The aluminum foil & water is a way of cleaning rust off chrome parts without further damaging the chrome. Simply wad up a fresh piece of aluminum foil & open it back up and fold it over a few times. Rub the rusted areas with the aluminum foil & some water. This will remove the rust. If the part isn't pitted all of the way through, the chrome will clean up nicely. If it's pitted all the way through then it will remove the rust but leave the pitting behind.
Ed. All the things you pointed out are being addressed. I noticed everything you did and when I went back to it today I found a SECOND, that's right, second washer sticking to the inside of the flywheel. The flywheel must have been in close proximity either to a box of washers or to my magnetic parts bowl, and retrieved them with its attraction properties.
So it's getting a new condensor, new points and I am going to coat the coils with some clear nail polish which I have found works well in the past. Those washers also broke away some of the edges of the insulators on the ends of the coils. Not badly, just enough to be noticeable to me. I will brush on some liquid wire insulator and address the exposed wire. It appears to be heat damage left behind by a DPO.
I also have a second coil set from the second motor, but I need two any way. I'll see what happens & what I can do. And yes, the Allen head screws used fit flush on the coil mount. I was careful about that. The old ones were stripped out on the heads.
I keep remembering your telling me to "slow down, you'll go faster!" That certainly would have helped me here! I was just so excited that I finally got a case together I rushed through things and did myself more bad than good. I shall recover. ; D Victor
Re: The Road Toad Starts Today!
Posted: Sat Jun 25, 2016 4:02 pm
by viclioce
Ahhhh! You just gotta love the first fire of the season in your back yard! And the sweet added scent of castor oil with it just can't be beat! ; D Victor
Re: The Road Toad Starts Today!
Posted: Sat Jun 25, 2016 4:17 pm
by hodakamax

Funny Victor!
Max
Re: The Road Toad Starts Today!
Posted: Sat Jun 25, 2016 4:54 pm
by viclioce
Funny Max, but just so true! This pipe burned out of both ends like a flame thrower too! It was dirty inside and after heating it up it started blowing an oily fluid out of both ends which would ignite and flash like a flame thrower!
This is the pipe for the second Road Toad! The other pipe is already done! ; D Victor
Re: The Road Toad Starts Today!
Posted: Sun Jun 26, 2016 1:25 am
by hodakamax
We discussed this a while back and all agreed it was big fun!

Maxie
Re: The Road Toad Starts Today!
Posted: Sun Jun 26, 2016 4:16 am
by viclioce
And the carbon from the fire sure gives a nice black finish too! ; D Victor
Re: The Road Toad Starts Today!
Posted: Sun Jun 26, 2016 1:48 pm
by viclioce
Well, I had 2 or 3 condensers lying around & somewhere I have another set of points (still to be located). I already brushed on some liquid wire insulator on the blue points wire and cleaned the shaft with 800 grit sand paper and it's threads as well.
I am convinced the binding problem was the washers stuck under the flywheel. They are responsible for ripping the top off the condenser as well as chipping away at the insulator boards. I applied some blue Loctite over the windings on the coils & let it dry. I think this will seal it well and is safe enough & heat resistant enough! I just need to get my soldering iron back from my son in law who borrowed it, to solder the wires to the condensor. I also sanded the curved edges of the coil bars to remove surface rust and make them shine again. Hopefully this will cure the issues and I can determine if there is any other place where contact us being made.
I did test it without the coil plate in place & there was no contact or binding issues. I think it was just the washers and the damage they did to the condenser which was causing the binding. But we will know soon enough! ; D Victor
Re: The Road Toad Starts Today!
Posted: Sat Jul 02, 2016 8:42 am
by viclioce
Still waiting for points to come. Couldn't find the set I had here. I'm sure once they arrive in the mail that the other set will show up! Just need those points to get everything set so I can put the motor together the rest of the way!
Greg mentioned moving the condensor out of the motor and single wire mounting it under the fuel tank. Has anyone else done this? Did you run the wire up the same exit as the coil wires? Just curious. I'm considering it. ; D Victor
Re: The Road Toad Starts Today!
Posted: Wed Jul 06, 2016 3:06 pm
by viclioce
Bump! Just to keep it near the top! ; D Victor
Re: The Road Toad Starts Today!
Posted: Wed Jul 06, 2016 4:43 pm
by dirty_rat
I have mounted the condenser under the tank on many of my bikes. All you have to do to tie it in is to splice it into the black wire from the points to the coil under the tank and ground the body of the condenser to the coil. On some I have obtained a condenser with a wire lead already attached that can be plugged into a wire junction and then no soldering is required. Just make sure that you tie together all the wires that were down in the stator area and make sure they are insulated so they don't ground out. It actually makes the stator much cleaner looking (as far as wiring goes) and keeps the condenser cooler. You can also change the condenser without pulling the flywheel afterwards.
Re: The Road Toad Starts Today!
Posted: Thu Jul 07, 2016 3:39 am
by viclioce
Sounds like a good idea. I like the idea that the condensor will be in a location which allows it to run cooler AND be easier to change. My old F6 had the condensor mounted under the tank. Seems like a logical place to put it. ; D Victor
Re: The Road Toad Starts Today!
Posted: Mon Jul 11, 2016 5:05 pm
by viclioce
Man! It has been SOOO hot here that I don't even want to go out into the garage and turn a wrench. My garage has been like an oven! We've been in the mid 90's and as high as 96*F. Now I know it gets hotter than that in other locations, but here in Santa Fe we say we lik to complain if I gets much hotter than 88*F! We haven't hit 100 outside but this is supposed to be our rainy month! It's a third gone and no rain yet. And we didn't have much in June either, except, of course, all the rain we got in Northern California while I was on my bike trip! Send me some rain!!!! ; D Victor
Re: The Road Toad Starts Today!
Posted: Mon Jul 11, 2016 7:19 pm
by matt glascock
Damn! I'll trade you. My riding land has a lot of river bottom and with incessant rain, it is like the Everglades!!
Re: The Road Toad Starts Today!
Posted: Tue Jul 12, 2016 7:11 am
by viclioce
Where do you live, Matt? You could come out here and go riding! Lots of great places to ride and my truck can easily hold two bikes! ; D Victor
Re: The Road Toad Starts Today!
Posted: Tue Jul 12, 2016 1:16 pm
by viclioce
Well I got the bottom end all buttoned up today. It only went up to 94*F! I Told my son in law to bring my dremel back to me when they come for dinner tonight. I'll use the dremel to champher the horizontal edges of the ports and also to do the exhaust bridge. If all goes well, I should have the motor done in a day or two! I believe I have everything I need to put the top end together. Piston, rings, gaskets, wrist pin, clips and upper rod bearing. I had to add a bit more Yamabond putting the cases back together but everything is moving smoothly now!
I'm hoping to get it into the frame and mount the carb/reed valve assembly before the weekend. Then it's install the ignition switch, install the front turn signals, and find some rear signals for it. I'm still going to run it premix and not use the oil injector.
More to come!!! ; D Victor.

Re: The Road Toad Starts Today!
Posted: Tue Jul 12, 2016 1:54 pm
by viclioce
Oh and I finally made a plank with the holes in it for the case & shafts to lie flat. That made things easier too! ; D Victor
