
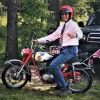
My grandfather moved into a smaller place a few years ago and during the move, my dad found the 1968 Ace 100 that I learned to ride on underneath an old sheet in the back. I had ridden other bikes prior to this one, but this bike was the first one that I really put a lot of miles on in the desert (I was 7 or 8 at the time).
I remember the last time that it was started, I kicked it over and the engine ran wide open. After immediately shutting it down, I pulled out the carb and cleaned it up a bit but it did the same thing when I started it back up. I didn't have time to mess with it then so I rolled it back into the shop and it sat there until my dad found it (probably 20 years later).
So short story long, I just made arrangements to have my father-in-law bring it up with him when they come up for the holidays and I intend on getting it running again for something to play around on and eventually teach my kids to ride on.
I intend on getting some stuff that I know it will need in the mean time so I already have it on hand when the bike arrives and was wondering if anyone felt I should add to it. My intent is to get it running and drivable first and then tear it down for a frame-up "brightening."
On my list currently:
Carb (or possibly just a rebuild kit)
Fuel line
Tires
Cable kit
Air cleaner
Spark plug
Can you guys think of anything else that I should go ahead and add to the list? Mainly, I'm looking for stuff that will definately have to be replaced after 20+ years. Stuff like fork seals will get swapped eventually, but for now I'm just looking at stuff that I'd need to get it running and able to be driven up the block and back (functional checks, no trails... yet).
Thanks,
Dan
___________________________________________________________________________________________
bobwhitman - 11/23/11 at 12:02am
Dan-
You may be surprised at how little it needs, if your description is accurate. Most such carbs don't need a kit (or replaced) they just need a careful cleaning. Do add a fuel filter to keep the plug out of the freshly cleaned carb. Expect to need to clean the points (tho, again, sometimes not!), using the 220 or 400 wet or dry, followed by a soft business card to complete the cleaning.
Let us know how it goes. It is always a wonderful feeling to have an old bike bark back to life!
Bob
PS: You d have a kill switch on it don't you? To stop any repeat of the dreaded "wide opens."
___________________________________________________________________________________________
Bullfrog - 11/23/11 at 12:53am
On that wide open situation, here are a couple of pointers.
1. With the carb freshly cleaned . . . a bit of light oil on the throttle slide as you reassemble it . . .
2. Before you re-install the air cleaner . . . (engine dead) . . . try the throttle. It should operate smoothly and you should stick your finger into the carb throat to assure the slide drops all the way closed when you release the twist grip.
3. Test that smooth operation with completely free moving slide clunking as it hits bottom with the handle bars turned left, right and straight ahead.
4. Failure to clunk closed freely could be a problem with the slide/carb, but it could just as easily (probably more likely) be the cable or the twist grip. No matter what it is -- fix it BEFORE starting the engine.
Oh boy are you gonna have some fun!!!
Ed
___________________________________________________________________________________________
JimKlaas - 11/23/11 at 1:04am
When I got my first Ace 90, it had been sitting outside under a tarp for years. The crank was filled with water and oil. I cleaned it out, changed the plug, put in fresh oil and the little bugger started on the third kick. They are amazingly tough little bikes. Enjoy it.
___________________________________________________________________________________________
taber hodaka - 11/23/11 at 9:23am
Sounds like you are going to have a lot of fun. Ed gave you excellent advice on your carburetor. In a dry environment it can be hard on engine seals. Make sure it is not running lean. Using a little more oil doesn't make it run cooler. The manual covers tuning the carburetor very well. Keep us posted. Clarence
___________________________________________________________________________________________
baglock1 - 11/25/11 at 11:22pm
Thanks for the info guys. I'll hold off on most of the parts (it definitely needs new tires) until I get it here and mess with the carb issue then. When I was looking over it last week, it felt like there was very little spring force in the throttle cable, but I'm sure I would have identified that immediately if it was the case back then.
And it has been stored in a very dry environment so I suspect there will be numerous seals that need to be replaced within the first couple of weeks of riding.
On a side note, is the shop manual worth buying for these bikes or is the basic info required for a rebuild available online?
___________________________________________________________________________________________
bobwhitman - 11/25/11 at 11:52pm
The manual is the best $$ you can spend; get it! It is a fine guide to all Hodakas, even when they differ a bit. I recommend the wombat guide, even tho you have an earlier bike. The later manual is better.
Bob
___________________________________________________________________________________________
baglock1 - 1/26/11 at 11:48am
Additionally, can someone confirm the tire size? Is it the 100/100x18 (rear) and 80/100x21 (front)? It looks like these are the sizes listed for the Wombat but thought they may be similar. Unfortunately, I neglected to write it down before I left my Dad's place.
On edit:
I took a second look at the exploded parts diagrams and noticed that they had the tires in there (didn't see them previously). From diagram S, it looks like the sizes are 2.75 x 17 (front) and 3.00 x 17 (rear). Before I go and commit the money, does that sound about right?
___________________________________________________________________________________________
Earl - 11/26/11 at 12:11pm
The 2.75 x 17 (front) and 3.00 x 17 (rear), are correct for a 68 ACE. But many years have past, and many owners changed their wheels, so you better check what is on your bike, before ordering. A 100/100 may not clear in your swingarm depending on the Manufacturer, so definitely check that out before buying. The smaller size tires are getting hard to find. Earl
___________________________________________________________________________________________
bobwhitman - 11/26/11 at 12:35pm
Not sure what you mean by a "Owner's Manual." Paul (here at Strictly Hodaka) sells the Shop Manuals and Owners Manuals. The former is most useful; the latter has limited info, but does have specifications unique to the bike it covers. Each is good to have, but most specs for an (early) 100 are the same as other 100s (Yeah, Rats may differ), and can be easily found. You might also find a friend with an Owners Manual and a copy machine.
Do not rely upon Clymers or other non-Pabatco manuals.
Bob
___________________________________________________________________________________________
taber hodaka - 11/26/11 at 3:15pm
I bought the workshop manual from Paul at Strictly Hodaka. It covers the ace 90-, 100, super rat and ace 100 B What a good book and at a reasonable price. Covers everything in great detail. Clarence
___________________________________________________________________________________________
baglock1 - 12/24/11 at 4:01pm
My in law's arrived the other day and the bike arrived with them.
Here are the pics!


And a strange collection of miss-matched tools, spare parts, and misc. junk.

And 2 questions:
What is the "emergency switch" for under the headlight?
Do these wires attach to the (missing) battery?

___________________________________________________________________________________________
Earl - 12/24/11 at 6:56pm
The switch is for running the bike on battery power, it is covered in the shop manual. The wires are for the battery and you don't need it at this point. Your cables look useable as well, just lube them up for now with WD-40 or even just 3 in 1 oil dripped down the opening between the sheath and the wire. You can make a little funnel out of some plastic and tape it in place to help.
You should check the link on "Leak Down testing" and do that for sure.
It looks you are starting with a very complete bike and that makes it very desirable (along with being the actual bike you rode), although it looks like it needs a lot of cleaning and re-chroming.
Earl
___________________________________________________________________________________________
baglock1 - 12/28/11 at 9:47pm
Thanks Earl. I figured that info was in the manual but was curious nonetheless. I was 99% sure about the wires but that switch was like a splinter in my brain. For the life of me, I could not remember what it was for.Earl wrote on 12/24/11 at 6:56pm:
The switch is for running the bike on battery power, it is covered in the shop manual. The wires are for the battery and you don't need it at this point.
Actually, the cables are pretty well shot. The front brake, throttle, and clutch cable outer sheaths are all cracked and missing significant portions of the plastic. Additionally, the exposed inner sheath is showing significant rust. The throttle cable feels like a baseball bat rotating in a bucket of gravel and the brake cable feels almost as bad. Given the condition, and what I consider to be be cheap cost of insurance (buying a new set from Paul), I just decided to order a new set.Earl wrote on 12/24/11 at 6:56pm:
Your cables look useable as well...
Have a link? I searched the forums and looked on the tech section of the main site but must have missed it.Earl wrote on 12/24/11 at 6:56pm:
You should check the link on "Leak Down testing" and do that for sure.
Yeah, the rust surprised me but I am happy that it's all still in 1 piece.Earl wrote on 12/24/11 at 6:56pm:
It looks you are starting with a very complete bike and that makes it very desirable (along with being the actual bike you rode), although it looks like it needs a lot of cleaning and re-chroming.
I have to admit, I am getting pretty excited (in a way that no other project in the past 10 years or so) about this projectwarhatchet wrote on 12/24/11 at 11:40pm:
Alrighty Dan, Looks cool! That will be a nice bike to restore. Take your time and you will have a blast from the past. Richard
___________________________________________________________________________________________
baglock1 - 01/02/12 at 8:01pm
I got the carb cleaned and the tank is currently under going electrolysis to remove the internal rust. In the meantime, I hooked up a temporary tank and tried to fire it up. No luck.
Some investigation revealed no spark at the plug. I ordered the shop manual the other day but according to UPS, have a few more days before it gets here.
In the meantime, can someone tell me which side the points are hidden under? I seem to remember them being under the right side (shifter side) but don't trust my memory. Also, what's the spec for them?
___________________________________________________________________________________________
BrainZ - 01/02/12 at 8:23pm
The points are on the left side (shifter side). Remove the shifter case to access them. The gap is .012 - .015 but more importantly the points should open when the timing mark on the flywheel lines up with the mark on the crankcase.
Brian
___________________________________________________________________________________________
baglock1 - 01/22/12 at 10:16pm
Thanks Brian. I noticed I said "right" but as you clarified, I meant left. Thanks again.
Quick update:
After my last post, I pulled the cover and the points "appeared" to be clean and adjusted properly. The adjustment was within spec. The flywheel nut was covered in rust so I soaked it with rust penetrant and put the cover back on. I hadn't touched it again until this afternoon, with the exception of getting the gas tank cleaned and reinstalled.
Tonight, I made a tool to hold the flywheel and got the nut off but then realized that I didn't have good (safe) way to pull the flywheel off. I stared at it for about 10 minutes and then put it all back together. I just got done ordering the right puller tool for it. I went ahead and ordered a new set of points and a condenser as well, just in case
Moving on the other areas...
The phillips screws holding the shifter inspection cover were stripped and so I went ahead and drilled a couple of pilot holes and removed them with an easy out. I thought the were #6 machine screws but alas, they too are metric. I'll head to the hardware store sometime this week to get a new pair.
I also filled the gearbox with fresh oil and wheeled it around the garage a bit to get the fluid moved around the clutch plates and gears.
At this point, I'm in a holding pattern until I get the parts and am able to get the spark issue sorted out. Once I get the flywheel off and am able to test the coil and replace the points and condenser, I'll feel a lot better about getting other stuff done (bought).
___________________________________________________________________________________________
baglock1 - 06/26/12 at 11:27am
Quick update:
I met Hodaka Dave and Debbie on their way back from Hodaka Days yesterday. They were kind enough to pick up the engine on their way back to MO. He'll be going through it and bringing everything back up to snuff and then test running it with my electronics.
In the meantime, I'm stripping the chrome bits for my father in law to take back to AZ to have a chrome shop give me a quote. I doubt it'll be cheaper than buying new parts, but we'll see.
I'll be getting the framer painted and tires replaced, as well as all the other general stuff that needs to be cleaned/polished.
Slowly making progress..
___________________________________________________________________________________________
baglock1 - 06/29/12 at 1:46pm
I've got the front end stripped down and will be rebuilding the forks and brakes.
Do the bearing races in the upper fork press in? After I got the forks off, and picked ball bearings off the floor, I tapped the races with a mallet but they seemed like they were solidly in place. At this point, I'm content to leave them in place and simply mask them off for painting, but I am curious just in case they're chewed up and need to be replaced.
In other news, all the chrome bits are off and ready for the drive to AZ. All that needs to be done with the rest of the bike is to finish pulling the rear wheel and suspension.
___________________________________________________________________________________________
RichardMott - 06/29/12 at 2:07pm
If the races on the steering head are not galled, the balls, which are a different size top and bottom, can be replaced. Look in the Strictly Hodaka site for the size and number of balls.
___________________________________________________________________________________________
END OF THREAD